Tech Talk
Tips on Setting Up a Powered Subwoofer
By Chris Hagen | Principal System Engineer

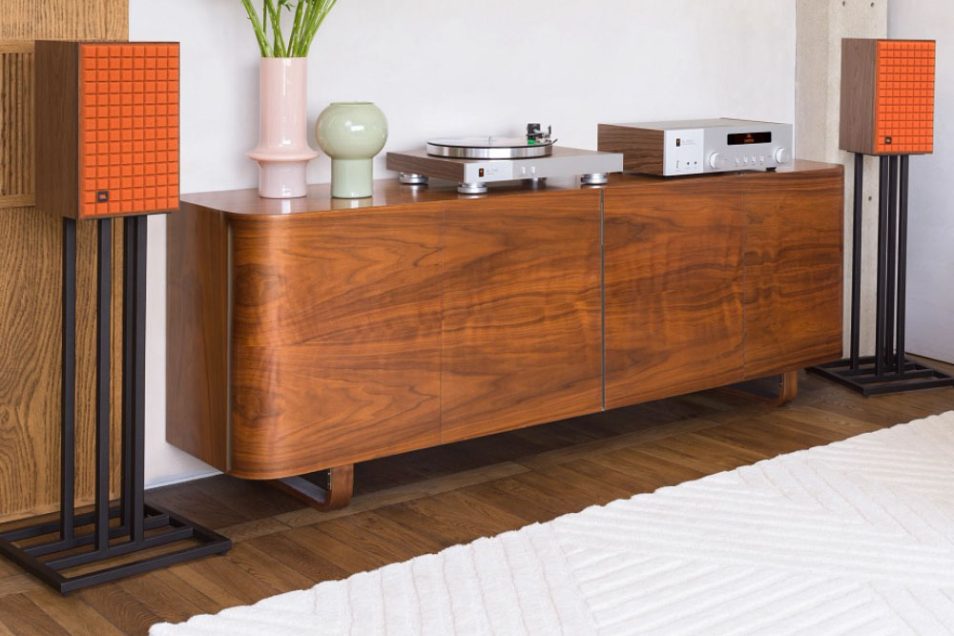
(This article focuses on a 2-channel system, the JBL L52 Classic and the JBL L10cs)
We are all familiar with how well the JBL L52 Classic performs – it has great bass response for its size, even to 35 Hz in-room. It also has a smooth response, and great imaging. (If this is news to you, I highly recommend that you listen to a pair because they do perform at a surprising level for their size!)
However, they are 5-1/4” 2-ways built into relatively small enclosures to fit smaller audio setups, so very deep or loud bass can be limited. They are also restricted to creating bass from their room position, which is optimized for mid- and high-frequency imaging. This is true in most 2-channel systems; the speakers that cover the midrange and high-frequency bands need to be set up for the best stereo imaging, but most of the time these positions are not the best in the room for reproducing bass.
The solution for this is one or two subwoofers. Using one or two subwoofers allows the speakers needed for imaging and detail to be placed where they work best for those qualities, and the speakers that are designed to reproduce bass (the subwoofer(s)) to be placed in the best position(s) in the room for generating bass.
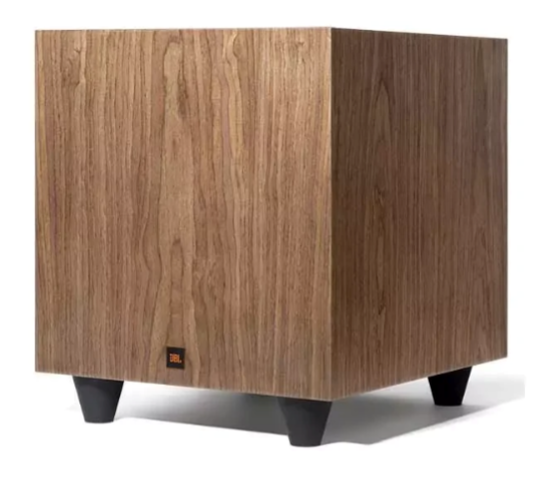
A great subwoofer for the JBL L52 Classic is the JBL L10cs Classic Subwoofer. This subwoofer helps to keep the L52 sound system small in size, but with its powerful amplifier and bass extension below 30 Hz, also helps to make it very impressive in acoustic capability. The downward firing subwoofer driver allows it to leave the Quadrex foam to the L52’s and gives it a very stealthy furniture look with the visible cabinet surfaces covered in the L52’s walnut finish.
This is a short article on how to set up a pair of JBL L52 Classic loudspeakers with the JBL L10cs Classic subwoofer, however since the technique is not unique to these models, the general process can be used for any subwoofer and satellite system. For more detail on subwoofer placement, please visit our video training center.
What I am going to say here is not original – it is the result of many years’ reading of the available audio magazines: High Fidelity, Stereo Review, Stereophile, Absolute Sound, Sensible Sound, Sound and Vision, Widescreen Review, etc. The articles on subwoofer/satellite setup have been very valuable and are too numerous to cite. Putting the suggestions into practice has been very helpful to me, allowing the setup of a subwoofer/satellite system in a minimal amount of time. But I encourage all reading this article to read further in case you would like to learn more.
Up front, it should be decided to what level some kind of measurement will be used. I am going to write this for the case of using one’s ears, but there are various relatively inexpensive tools for acoustic measurement available at DIY internet retailers such as Madisound and Parts Express. With those, you can measure at the listening positions (average these!) instead of listening, but I believe listening helps with the subjective side of the experience. If you have a measurement system, all you do is measure with the subwoofer at each position at the listening position or over averaged listening positions and adjust the controls until a smooth response is created.
(Note that measurement is different from a room eq, such as Dirac, which measures and then corrects. Room eq’s are intended for correction of the room only. Room eq can help, but it is always best to get the subwoofer/satellite blend sounding reasonable before you run the room eq.)
Fortunately, it is also fairly easy to do by ear as well, as long as there are only a few positions to remember, and this is what I will cover here. When you listen, be sure to use either a swept sine wave with noted frequency (David Renada has a very good one), or music that has a good and melodic bass or cello solo that spans from the lowest note up to the bottom end of the midrange if possible. Multiple selections that cover the range can work as well.
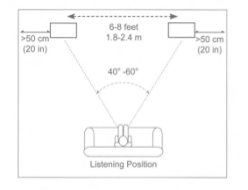
The first step is to place the speakers. The satellite positions are usually dictated by room shape and listening position in the room and placing them at two corners of a roughly isosceles triangle with the listener at the third corner. Be sure to support them the way they will be used – use a pair of JS-65’s for the L52 Classics if that is how they will be used. With the electronics off, be sure to wire them into the audio system.
Second, we consider room placement for the subwoofer. Since every room is different, the end user, after consideration, will decide the best subwoofer placement. What are the possible options? The answer to this can come from room construction, purpose of use, furniture placement, or even the opinions of other users of the audio system. Some room constructions or furniture placements may make some positions unusable. Shared walls with people who don’t want to hear the system can control the position as well. Some users may want to have the subwoofer hidden, but a room in which the product is shown off, like a retail soundroom, drives towards having the subwoofer up front and visible. Keep in mind that the room floor and walls enhance the energy transfer into the room, so the subwoofer should be placed along a wall and maybe into a corner. Placing the subwoofer out into the room will make it more difficult for the subwoofer to energize the room. All positions should be noted or remembered for the comparison stage.
As noted in our subwoofer training videos, corner placement is best for level. This would be wise to use if more output from the subwoofer is desired. Somewhere mid-wall is also good, but corner and mid-wall placements excite different modes. One could place one subwoofer in a corner and one somewhere mid-wall to smooth the room modes out some. This has worked well for me in the past. My mid-wall placement is more like 40% out of the corner, following the Golden Rule dimension and seems to work well.
Some unusual placements should be mentioned as well. I have seen success with a problem room type – one with an opening into another space – by placing one subwoofer inside the listening room but between the listener and the opening. This helps make a pressure build-up at that point and seems to contain bass from the other subwoofer in the listening area. And one of the best ways to reduce annoying others with the subwoofer is to place it very close to the listener – a personal subwoofer. This helps reduce room influence as well.
Now that potential positions for the subwoofer have been identified, we need to evaluate them. If there are only one or two positions, you can move on to the normal listening comments below. Otherwise, the best way to evaluate the positions is to place the subwoofer in the main listening position and then listen or measure at each potential position being considered for the subwoofer. This is called “The Crawl Test” and works best if you get your ears near to where the subwoofer will be.
When doing this, connect the subwoofer and turn on the system. While playing the music selection, adjust the subwoofer controls so the subwoofer is about the right level and the mid-bass sounds full without being excessive. The settings don’t have to be perfect yet.
To get a reasonable source sound for the Crawl Test, we start with subwoofer level. The best way to get the subwoofer level correct is to play a selection with deep bass along with notes and voice in the satellite range. Adjust the volume control so the deep bass notes sound like they are about the same level as the notes and voices in the satellites.
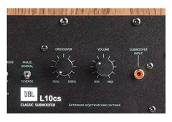
The crossover blend can be perfected by listening to selections with good mid-bass – cello, viola, or electric bass are good for this. Adjust the crossover in the direction that you would expect based on the satellite’s stated performance until the mid-bass sounds full but at the same level as voice in the satellites and the deep bass. If the mid-bass thins out as you do this, try adjusting the subwoofer’s phase control toward its other extreme. If it is at 0 degrees, turn it towards 180 degrees or vice versa. If it is a polarity switch, then try the other position. Then re-adjust the crossover for equal level between deep bass, mid-bass, and midrange from the satellites.
Now, continue the Crawl Test by listening at each potential subwoofer position while the subwoofer is in the listening position. The best position is where the blend sounds the best – closest to equal level in the deep bass, mid-bass, and midrange. Once this position is found, the subwoofer can be moved to the position and final listening adjustment can be done.
Final adjustment is the same as adjustment when you have only one or two spots available for the subwoofer and is done after the satellites and subwoofer are in their final positions and connected. Once again play the selection with the deepest bass. As you adjust for level, listen carefully, and adjust the subwoofer level so the bass is present but not overwhelming (be sure to use signal less usage of enhanced bass such as jazz or classical if you can’t find a sine sweep).
Now play the selection with mid-bass content. For the mid-bass, adjust the crossover frequency and subwoofer phase or polarity for the smoothest response but do not adjust the subwoofer level. Again, you are listening for all frequencies in the region to be about the same level.
At this point, I usually adjust the bass level for the purpose of the system. If it is a personal system, I strive for absolute neutrality and typically end up turning down the bass slightly after the final adjustment. If it is a demo system, especially to show off the subwoofer, I turn the subwoofer up slightly. Similarly, if the end user prefers bass-heavy music, then the subwoofer can be turned up to that user’s liking.
Using this method, the L52 Classics with the L10cs rivals the reproduction of the L100 Classic. This is because the subwoofer can be placed in the room at a best-for-bass position, and the satellites can be placed in positions that are best only for the mid-bass frequency range and higher, and for stereo image. The L100 Classic, being an all-in-one speaker doesn’t have this ability, so there is always a compromise.
Since there is nothing mentioned here that is specifically limited to the JBL L52 Classic and/or the JBL L10cs, this process can be used for mating any satellites to any appropriately-sized subwoofer. However, I highly suggest that if you haven’t heard it already, you should get a pair of JBL L52 Classics and an L10cs, then follow the steps listed here and be blown away.