Tech Talk
Dirac Live Hints and Tips
By James Todd – Technical Trainer, Harman Luxury Audio Group EMEA
Dirac Live is an immensely powerful tool for getting the most out of an audio system with Arcam and Lexicon AV products. However, it is not an automated process – and it is all the more powerful and useful as a result. This means that anyone attempting to optimise with Dirac Live has the opportunity to make it worse! This is a set of tips that will help you avoid the most common mistakes when implementing Dirac Live.
1. System design and installation
Dirac is capable of improving the performance of all loudspeakers, including those that may not be in ideal locations. However, a system with loudspeakers in sonically ideal locations will still sound better when giving Dirac less to correct. We recommend the Dolby Atmos setup guide (available from the Arcam and Lexicon websites) be consulted as part of any system design. With or without Dirac, a correctly positioned speaker will always sound better than an incorrectly positioned one. So make sure a system is capable of sounding good before Dirac.
2. Tools
There is a selection of items you must have to complete Dirac Live optimisation:
i) A PC or Mac computer. It will need to have Windows 10 or MacOS High Sierra/Mojave for the latest versions of Dirac Live.
ii) A microphone stand. A high quality measurement microphone is supplied with Arcam and Lexicon AV products but you will want microphone stand, ideally with a boom, to hold the microphone steady and free of contact with furniture.
iii) A spare router. This is important for those who offer Dirac Live optimisation as a service. If you don’t know the network, don’t get bogged down in trying to fix communication errors between the Dirac Live software and the Arcam or Lexicon AV product. Instead, get out your own router that you have used before and, most importantly, you know works!
iv) Two ears and a brain. Engage both to evaluate what Dirac has measured, how to make suitable adjustments and analyse the result with your ears.
3. Software updates
Before adjusting any settings or starting Dirac Live software, make sure the Arcam or Lexicon AV product is operating the latest software. Visit the Arcam or Lexicon websites to find the latest versions. The latest version might still need to be loaded onto brand new products. The final part of any software update to an Arcam or Lexicon AV product is to factory reset the device. This will erase all settings and Dirac profiles loaded, so it is advisable to complete the software update as the first task. Visit live.dirac.com/download to get the latest version of Dirac Live.
4. AV product settings
There are some settings within the Arcam and Lexicon products which are vital for Dirac to function correctly:
i) Enable and disable all loudspeaker channels as appropriate; otherwise, Dirac will attempt to optimise loudspeakers that are not present, or not optimise channels that are.
ii) Within the General settings of the product, the Control must be set to “IP.” If not, the product will not respond to commands sent by the Dirac Live software.
5. Microphone selection and calibration file
On the face of it, this might seem a simple step but it’s important to get right. Get this bit wrong and the whole process from here is in error and will make the optimisation sound worse. The things to watch out for here are:
i) Ensure you select the microphone you intend to use and not the microphone built into your laptop. If you are not sure, disconnect the microphone you want to use and watch it disappear from the list. Reconnect it and select the newly appeared icon in the list (unlike the old versions of Dirac Live, the latest versions allow for the microphone to be hot-pluggable, meaning they can be disconnected and reconnected without needing to restart the program).
ii) Make sure you have the correct calibration file for the microphone you are using. 3rd party microphones will have a calibration file available to download from the manufacturer’s website. The calibration file for the microphone in the box is included in a bundle of downloads from each product’s respective webpage. If you are using the black USB stick microphone we supply, please use Arcam_AVRMicCal2 or Lexicon_AVRMicCal2. You will find another calibration file included within the same directory of the download. This is for the original puck microphone with USB adaptor which we no longer supply.
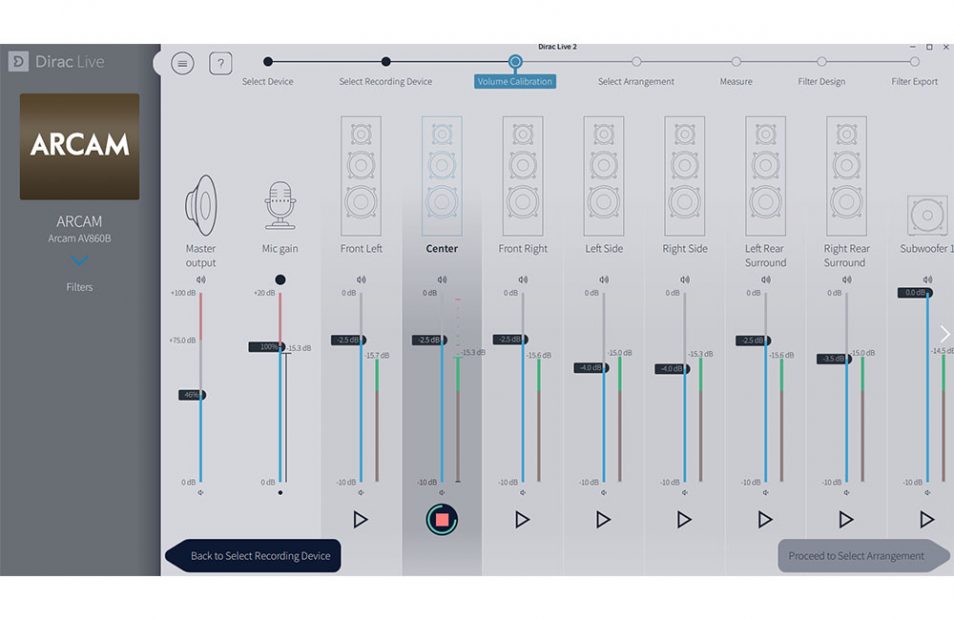
6. Volume calibration
This step in Dirac is about setting the levels for measurements. It does not define the gains applied to each channel after calibration. There is a 4-step process for correctly setting the volume levels without spending hours endlessly tweaking:
i) Position the microphone in the Main position. If you are not sure where this is, consult the Measurement Arrangements in the next step. The main position is always in the head position of the centre seat in the room with the microphone pointed straight up at the ceiling.
ii) Observe the level meter next to the Mic Gain adjustment. If you can’t see it, you likely have a lovely quiet room. If you can see it, make efforts to reduce noise by turning off projectors and air-conditioning. If there is background noise that you cannot control (sustained noise and not occasional) you can compensate by reducing the Mic Gain gently until the level meter disappears at the bottom (the dB reading will remain). You should not be playing pink noise out of any channel for this step.
iii) Next, play the pink noise in each loudspeaker and raise the master output when you find the next quietest channel. Your reference is the quietest loudspeaker. Raise the Master Output until the level from the quietest channel measures close to, but below the 100% mark on the Mic Gain level meter. When the test tone stops you will be left with a level mark for that channel. This will be somewhere between -13dB and -16dB.
iv) At this point, all the other channels are showing a higher output level than the quietest channel used for reference. You should now reduce the output for those channels one by one. You should not be adjusting the Master Output or the Mic Gain at this point. If you have played a test tone out of each speaker already, a level mark will have been left so you do not need to play the tone again. You can reduce the channel level and Dirac Live will give a visual feedback. However, it is more accurate to do this with the pink noise playing. Do not be concerned with matching the measured level exactly. Dirac Live measures within 0.1dB but you only need to ensure that all the levels are within +/- 0.5dB. Dirac Live will measure the output levels for setting gains during the measurement process.
7. Measurement arrangements
There are several things to bear in mind when considering your measurement positions, and these might help you select between the measurement arrangements:
i) Never measure within 18” (45cm) of a boundary (wall).
ii) Keep all measurements a minimum of 12” (30cm) apart.
iii) Remove any objects (chairs or other furniture, including yourself) from the line of sight between the measurement microphone and all the loudspeakers (don’t worry about this for subwoofers).
iv) The more measurements, the better the result.
v) Don’t take measurements of seats/areas that are not important or relevant to the cinematic experience. Keep measurements focused around the best seats in the house.
8. Taking measurements
To get the best measurements, consider the following:
i) Keep the room quiet. You should already have turned off sources of background noise (projectors, AC etc.) at the volume calibration step. Ensure that the measurements are taken without background noise from other sources – particularly doors being opened and closed, and conversations in adjacent rooms. The microphone will pick this up.
ii) Ensure the microphone is oriented straight upwards for each measurement and that the microphone is securely fixed in position with the microphone stand.
iii) Don’t be afraid to abort and re-measure positions where interruptions occur.
iv) Get a longer USB cable for USB measurement microphones where required. Longer cables do not affect measurement performance except for the general cable length limits of USB 2.0.
9. Filter design
After you have taken all your measurements, it is time to create your optimisation. This is achieved by manipulating a target curve. The target curve is the output you want Dirac to achieve, and Dirac will achieve your target by creating mixed-phase filters in the background. Beyond taking erroneous measurements, this is where it can all go wrong and so you will need to engage your brain! Consider the following tips:
i) Know what you are looking at. Dirac Live presents the results of the measurements with an average output by frequency. The speaker will govern at what point the low frequency output starts to roll off as frequency descends, but otherwise the measured response below 300-500Hz is almost entirely dictated by the room. Above 300-500Hz, the measured response is very much that of the loudspeaker. Here you might be able to spot some patterns associated with the tuning of some speakers. Overlaid on this graph is the target curve which you will manipulate to create the chosen optimisation for your system.
ii) Load the Harman Target. The Harman target The Harman target curves are included in the download bundle with the microphone calibration files from the Arcam and Lexicon websites.
- a. These targets have been developed as part of Harman’s wider research into the science of sound and verified through subjective and objective listening tests by trained and untrained listener groups in double blind tests (neither the test operator nor the subject knows what they are listening to – all samples are hidden behind acoustically transparent drapes). These targets are proven to offer optimum sonic performance and can be deployed across all loudspeakers, with modified versions available for subwoofers and limited range loudspeakers.
iii) Use the same target for all loudspeakers where relevant (the exception is going to be the subwoofer). You should never set a different target for loudspeaker pairs - this is why they are grouped as pairs by default. You can, however, drag and drop loudspeakers from one group to another within Dirac Live to treat more loudspeakers with the same target. Equally, you can save and reload a target onto additional groups of loudspeakers. If all the speakers are the same, give them all the same target. It will sound better and save time.
iv) Focus on adjusting the low frequency and high frequency roll off. If you are using the Harman target curve, there is very little that you need to change, but you should always pay attention to the low frequency and high frequency extremes. Never ask Dirac to add output beyond the loudspeakers’ measured capability; this will only add distortion and can damage speakers and amplifiers (shown below in red).
10. Dirac is amazing, but has limits
Dirac Live filters are delivered within the DSP of the AV product and at most can add 8dB. It is not wise to use all this gain as it can be detrimental to sound quality. On the flip side, Dirac can reduce output endlessly. Large peaks in the measured response can easily be flattened for much smoother sound but large troughs in the measured output are much harder to correct. You should insert a “notch” into the target curve to reduce the gain that Dirac Live will attempt to add at that frequency. You can verify the effect of the target by checking the “corrected” box on the right hand side column (under the channel groups). This will show you the expected corrected response that Dirac will achieve. If the trough is significant in size, Dirac may not be able to fully correct it anyway.
11. The Top Tip – practice makes perfect
There is no better understanding than that gained from experience so where possible, undertake a Dirac optimisation as frequently as possible. Those who regularly optimise systems with Dirac in a variety of different rooms will be better at getting the best results.